In modern DevOps practices, automation plays a crucial role in managing infrastructure, and tools like Ansible and GitHub Actions are essential for automating tasks such as configuration management and continuous integration. A common scenario might involve integrating monitoring solutions like Datadog with your infrastructure, and one way to achieve this is by using Ansible Galaxy roles within GitHub Actions.
In this article, we’ll walk through the process of importing an Ansible Galaxy role into a GitHub Action workflow. We’ll use Datadog as an example, showing how you can automate the installation of monitoring agents across your infrastructure.
Step-by-Step Guide to Using Ansible Galaxy Roles in GitHub Actions
1. Install the Datadog Role from Ansible Galaxy
Ansible Galaxy is a public repository of roles and playbooks that you can use to automate various aspects of IT infrastructure. For our example, we’ll be using the cloin.datadog role, which provides all the configurations necessary to set up Datadog agents on your systems.
To install the Datadog role locally, run:
ansible-galaxy install cloin.datadog
This downloads the latest version of the role from Ansible Galaxy. If you want to install it to a specific directory, such as a roles/ folder in your repository, you can add the -p option:
ansible-galaxy install cloin.datadog -p roles/
This step ensures that your Ansible environment has the role ready to use in your playbooks.
2. Create a GitHub Workflow
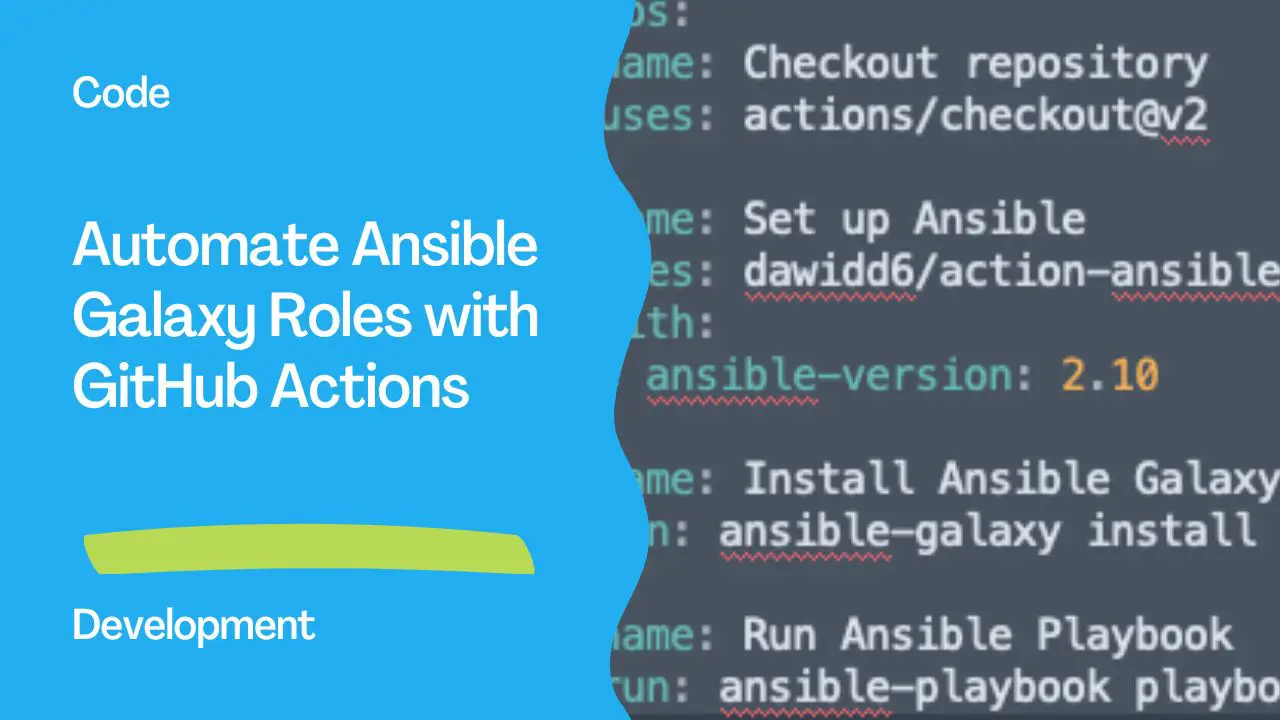
GitHub Actions allow you to automate tasks directly in your repository. The first step is to create a workflow file, typically placed in .github/workflows/. For our example, we’ll name it main.yml. Here’s a sample GitHub Action workflow that includes steps to install the Datadog Ansible Galaxy role and run the associated playbook:
name: Ansible Galaxy Role CI

on: [push]

jobs:
  setup-and-run-ansible:
    runs-on: ubuntu-latest
    steps:
    - name: Checkout repository
      uses: actions/checkout@v2

    - name: Set up Ansible
      uses: dawidd6/action-ansible-playbook@v2
      with:
        ansible-version: 2.10

    - name: Install Ansible Galaxy roles
      run: ansible-galaxy install -r requirements.yml

    - name: Run Ansible Playbook
      run: ansible-playbook playbook.yml -i inventory
3. Define the Role in requirements.yml
To ensure the role is correctly installed during the GitHub Action workflow, create a requirements.yml file. This file lists all the roles you want to install, including the Datadog role. Place this file in the root of your repository.
Here’s what the requirements.yml file would look like for the Datadog role:
---
- src: cloin.datadog
  version: 1.0.5  # Specify the version if needed
When the GitHub Action runs, it will automatically install the cloin.datadog role from Ansible Galaxy before executing your playbook.
4. Write Your Ansible Playbook
The next step is to create an Ansible playbook that uses the imported role to configure Datadog on your target systems. Here’s a simple playbook example, playbook.yml, that installs and configures the Datadog agent:
---
- hosts: all
  roles:
    - cloin.datadog
  vars:
    datadog_api_key: "YOUR_DATADOG_API_KEY"
    datadog_agent_version: "7"
In this playbook:
- We specify
cloin.datadogas the role. - The necessary variables like
datadog_api_keyanddatadog_agent_versionare defined. Make sure to replace"YOUR_DATADOG_API_KEY"with your actual Datadog API key.
5. Run the Workflow
Once the GitHub workflow and playbook are set up, push your changes to the repository. The workflow will automatically trigger on each push, and GitHub Actions will execute the steps:
- Checkout the repository.
- Install Ansible using the action
dawidd6/action-ansible-playbook. - Install the required Ansible Galaxy roles listed in
requirements.yml. - Run your Ansible playbook to deploy and configure Datadog agents across your infrastructure.
You can monitor the progress and results of each step in the “Actions” tab of your GitHub repository.
Why Use Ansible Galaxy Roles in GitHub Actions?
Integrating Ansible Galaxy roles in GitHub Actions allows you to automate and standardize your infrastructure management without manually setting up every configuration. Here are a few key benefits:
- Consistency: Roles provide reusable configurations, ensuring that the same playbook works across multiple environments.
- Scalability: Automating your infrastructure with GitHub Actions and Ansible ensures that deployments scale effortlessly across servers.
- Reduced Human Error: Automation reduces the risk of manual errors during configuration changes, improving the reliability of your deployments.
- CI/CD Integration: With GitHub Actions, you can easily incorporate infrastructure management into your continuous integration/continuous deployment pipelines.
Conclusion
By leveraging Ansible Galaxy roles in your GitHub Actions workflows, you can streamline the process of managing your infrastructure. In this article, we showed you how to import and use the Datadog role, but the same process can be applied to other roles available on Ansible Galaxy. This powerful combination of Ansible and GitHub Actions allows you to efficiently manage configurations, monitor your systems, and ensure that infrastructure changes happen automatically and consistently.
With this setup in place, you’re well on your way to automating and simplifying your infrastructure management using Ansible and GitHub Actions.
Subscribe to the YouTube channel, Medium, and Website, X (formerly Twitter) to not miss the next episode of the Ansible Pilot.Academy
Learn the Ansible automation technology with some real-life examples in my
Udemy 300+ Lessons Video Course.

My book Ansible By Examples: 200+ Automation Examples For Linux and Windows System Administrator and DevOps

Donate
Want to keep this project going? Please donate